Introduction
I remember I had a group project in university for software architecture (scary, I know), We were four in the group, and we had to make a “simple” three-tier web application: front end, back end, and MongoDB. Sounds straightforward, right? Except we had:
Four Machines and four different Operating Systems (Windows, macOS, Arch, and Ubuntu), and this led to a lot of “but it works on my machine” moments.

Every demo night, someone’s build would break because a dependency went missing or a port was already in use. We spent more time debugging environments than writing actual code.
Then we discovered Docker. But what exactly is Docker? How did developers manage their environments before containers became a thing? And how do you put Docker to work in your own projects?
That’s exactly what we will take a look at in today’s blog.
The world before containers
Back in the pre-container era, every application lived on its own physical server. Imagine allocating an entire 100 GB disk, a 16 GB RAM machine running Linux and Nginx, just to host a URL-shortener, which receives a long URL, puts it into a small SQLite database, and returns a short link. That light-weight workload barely uses any CPU or memory, yet you still had to buy, power, cool, and maintain the whole server, leaving most of the resources not used.
To fix this, we started using Virtual Machines. A VM lets you divide a single server into several virtual servers, each with its own Operating System, so instead of having one 100 GB/16 GB server, you can start four VMs each with 25 GB of disk space and 4 GB of RAM, and host 4 separate apps on the same hardware.
But something was still missing. VMs, by design, are heavyweight; they have a full operating system image, which takes a lot of storage and memory just to stay running. Even after splitting a server into smaller VMs, the problem of resource waste remained. Lightweight applications rarely use all the CPU or memory they’re given, leaving much of the allocated resources not used, even though you paid for them.
Also, VMs didn’t solve the “works on my machine” problem either. Just because your app runs perfectly on your local VM doesn’t mean it will behave the same in staging or production. A small mismatch, like a different version of Node or even a local setting, can lead to unexplained crashes. Your app might work smoothly in development and then completely fall apart when deployed.
Then Docker came to solve all these problems✨🐳
What is Docker?
Docker is an open-source platform that lets you package an application, along with everything it needs to run (files…lots of files, because “everything is a file” in linux), into a portable, lightweight unit called a container.
A container bundles your code, runtime, libraries, and configuration into a single immutable image that runs the same on any machine that has Docker installed, a laptop, an on-prem server, or a cloud VM.
But what is the difference between Docker Containers and Virtual Machines?
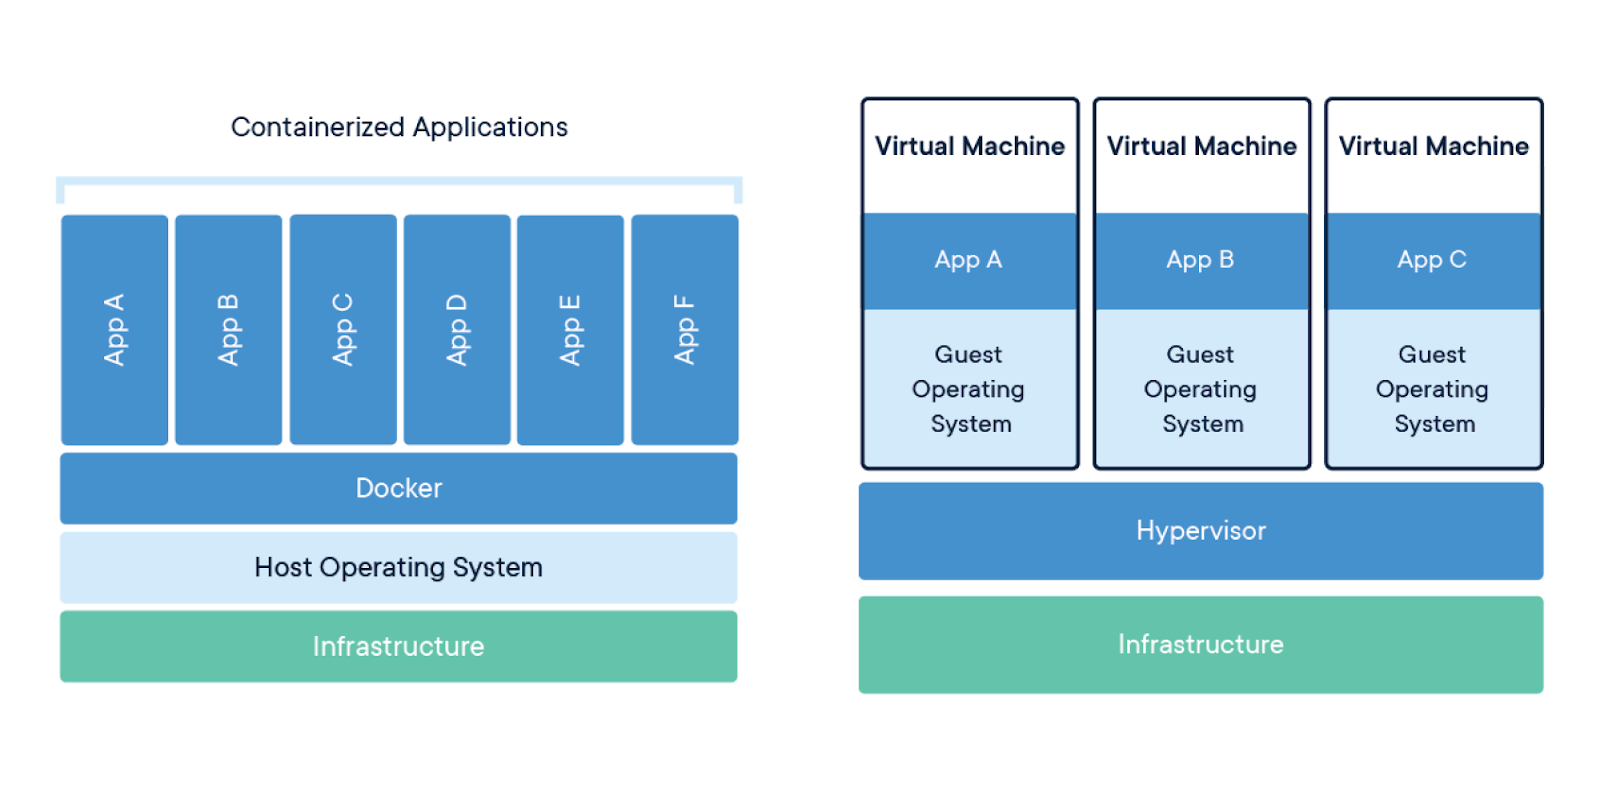
(Source: Docker.com)
Containers:
- Share the host OS kernel (no guest OS).
- Start in seconds; overhead is tiny (megabytes).
- High density (hundreds per host)
- Ideal for microservices, CI/CD jobs, and dev environments.
Virtual Machines:
- Each VM carries its own full guest OS.
- Boot in minutes; overhead is large (gigabytes)
- Limited density (usually single-digit VMs per host)
- Best for complete OS isolation, legacy apps, or different kernels.
If we had containerized that software architecture project, each teammate could’ve started the exact same environment with a single command, no missing libraries, and no last-minute surprises.
But how can we do that?
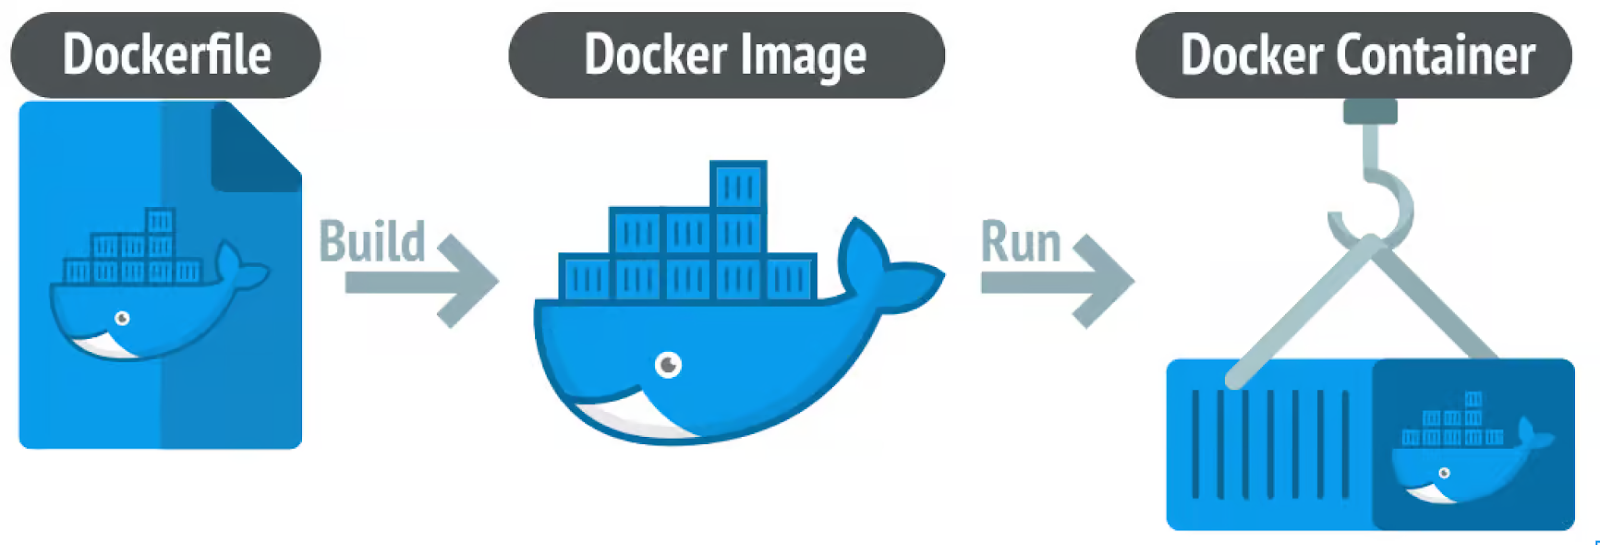
Before we start “Dockerizing” our application, there are four core concepts we need to understand👇🏻
- 📝Docker File
- 📦Docker Image
- 🛳️Docker Container
- 🛠️Docker Compose
Imagine you are running a food truck. To make everything run smoothly and consistently, you need a system. Docker gives you exactly that, and here’s how:
📝 Docker File = The Instructions to Create the Recipe Book
This is your step-by-step guide to creating the recipe book (Docker Image)
- Turn on the stove
- Add ingredients
- Write down the cooking method
Example
To understand it better, let’s take a look at this simple Dockerfile👇🏻
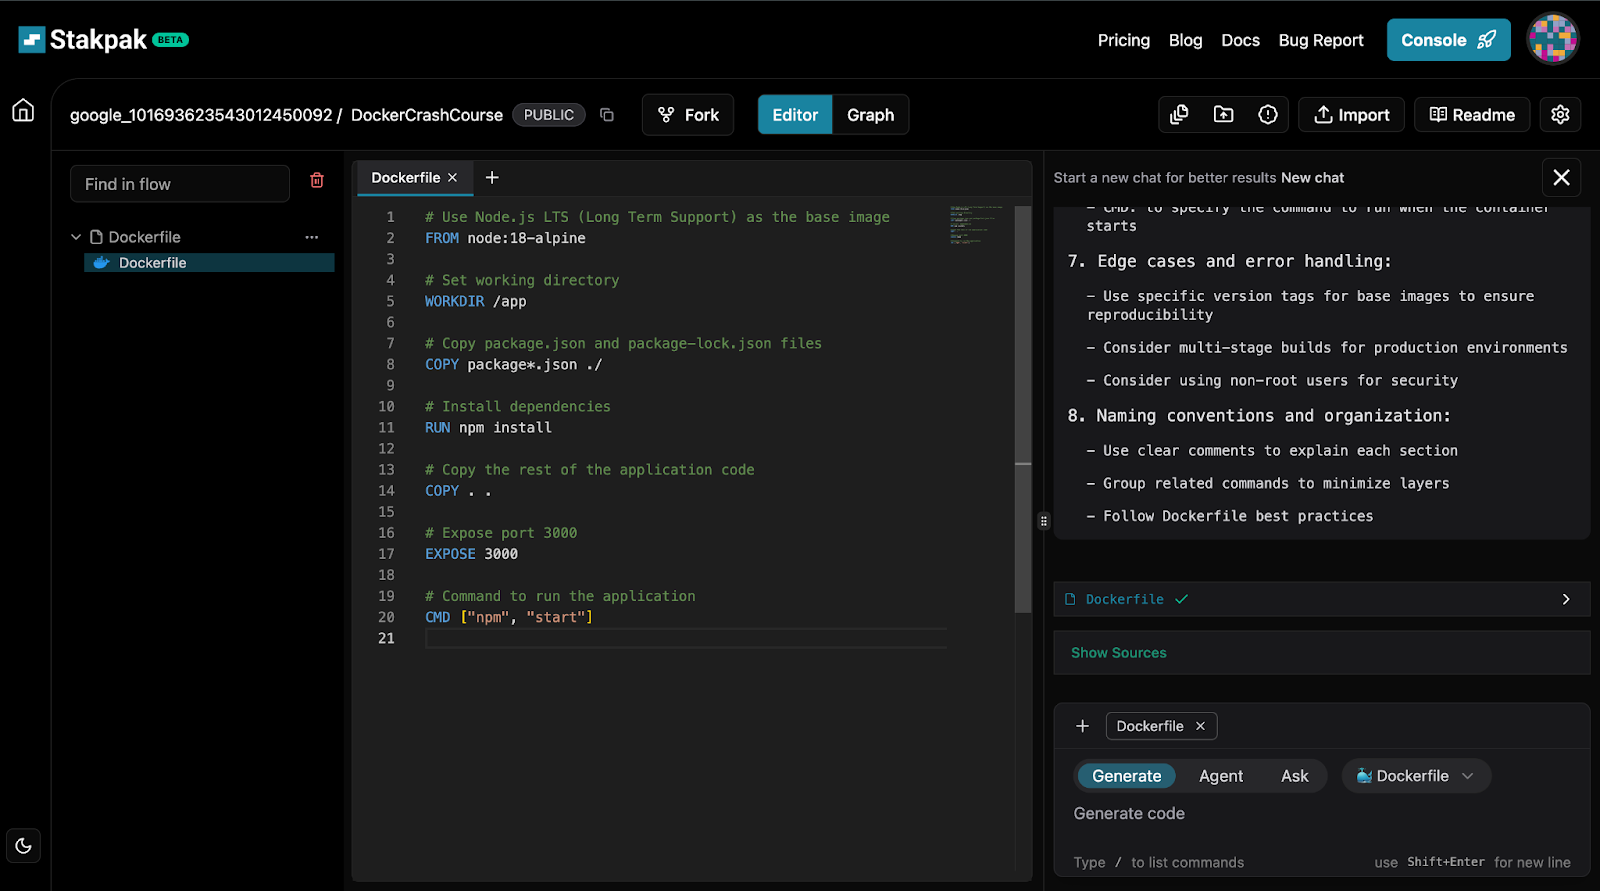
(Stakpak Prompt: Write a simple Docker File)
Think of this Dockerfile as the step-by-step setup for your own food truck kitchen. It starts by choosing a ready-made truck that already has a basic kitchen installed, in this case, a lightweight Node.js environment using the node:18-alpine image.
Once inside the truck, you decide where you’ll be working by setting the working directory to /app.
Then you bring in your shopping list, the package.json and package-lock.json files which list all the ingredients (dependencies) your app needs.
The npm install command is like going out to buy everything on that list.
After that, you move in all your tools and recipe files (your actual source code) with COPY ..
You tell people where they can find your serving window by exposing port 3000, which lets others know how to interact with your app.
Finally, when the truck starts up, you tell the chef to begin cooking by running npm start. And just like that, your food truck (or Node.js app) is ready to serve!
Now that our recipe book is ready, it’s time to cook up (Build) our first image!
📦 Docker Image = Your Recipe Book
This is your master blueprint. It contains everything needed to prepare your meals, ingredients, cooking steps, and even the kitchen setup. It’s read-only and reusable. Just like an image, once it’s built, it never changes.
But a recipe book alone doesn’t serve customers. To bring it to life, you need a food truck that follows the recipe and serves the meals; that’s where containers come in.
🛳️ Docker Container = The Actual Food Truck
A container is like your food truck out on the street, using the recipe book (Docker Image) to make and serve food. You can have many trucks (containers), each using the same recipe book (image), working independently.
But what if you have multiple trucks (containers), What would you do to run them effectively?
🛠️ Docker Compose = The Orchestrator of Multiple Food Trucks
If you’re running a full food festival with several trucks, one for burgers, one for fries, and one for drinks, Docker Compose helps you set everything up at once. It coordinates your trucks (containers), ensures they start together, and handles communication between them.
(This analogy was created using Stakpak.)
Now that we understand the core Docker components, let’s take a look at the main commands that you need to know
Docker Commands Cheat Sheet
Build your Docker image
docker build -t stakpak-app-demo .
- Replace “stakpak-app-demo” with the image name
- . tells Docker to look for the Dockerfile in the current directory.
Run a Docker container
docker run -p 3000:3000 stakpak-app-demo
- The -p 3000:3000 flag maps port 3000 in the container to port 3000 on your local machine.
- Replace “stakpak-app-demo” with the name of your image.
List running containers
docker ps
- Shows all containers that are currently running.
Stop a running container
docker stop <container_id>
- Replace <container_id> with the actual container ID from the “docker ps” command.
Remove a stopped container
docker rm <container_id>
- This command removes containers that are no longer running.
Remove a Docker image
docker rmi stakpak-app-demo
- Replace “stakpak-app-demo” with the name of your Docker image.
Run multi-container apps with Docker Compose
docker-compose up
- Starts all services defined in your docker-compose.yml file.
Stop Docker Compose
docker-compose down
- Stops and removes all containers and networks created by Docker Compose.
Stakpak Makes It Even Easier
We’ve broken down the Docker basics, but what if you didn’t have to write the Dockerfile or memorize all these commands?
That’s exactly where the Stakpak Agent comes in. It handles Docker setup, builds images, runs containers, and even generates your Docker Compose files, all from a simple prompt in your terminal. You focus on writing code, and it takes care of the infrastructure.
Containerize an App with Stakpak Agent in 3 mins (8 mins uncut)
TL;DR:
This TLDR was generated with stakpak
In this blog, we explored how Docker can solve the classic “works on my machine” problem using a fun food truck analogy. We looked at how software was deployed before containers, why Virtual Machines weren’t enough, and how Docker containers offer a lightweight, consistent solution.
We broke down the 4 key Docker concepts:
- 📝 Dockerfile – Your setup instructions (the recipe).
- 📦 Docker Image – The blueprint (the recipe book).
- 🛳️ Docker Container – The running app (your food truck).
- 🛠️ Docker Compose – The coordinator that manages multiple containers (a whole food festival!).
By understanding these, you’re ready to start Dockerizing your own apps with ease and tools like Stakpak make the process even smoother.